Thursday, June 30, 2011

Strawberries: Making sorbet


I planted 250 more everbearing strawberry plants this spring, so I came up with a bunch of different uses for them.  One of my favorites (after margaritas) is sorbet.  It's very easy and a whole lot less expensive than those teeny cartons at the grocery store.  I found a great recipe at King Arthur Flour.
 First pick those yummy berries.
Wash and rinse, shaking out the excess water.

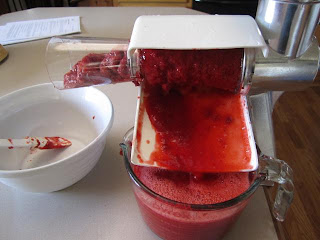
If you own a food mill (and I highly recommend getting one) you don't have to hull or spend time running them through a sieve to get the seeds out, just grind them up in your food mill after you've dried them and they'll be almost completely seedless.  If you don't own a mill GET ONE!!  But seriously, you'll have to hull the berries and blend them up in your processor or blender, then push the juice through a sieve to remove the seeds.  Pain in the neck, when a mill is SO much easier (and you'll  find a ton of uses for it later).  You'll need 3 cups juice, save the extra for syrup (add equal amounts sugar, let macerate overnight) for pancakes, yogurt, ice cream, margaritas....the list goes on endlessly!

Yummy juice!!
Baby approves.

In a saucepan, combine 1 cup sugar and 1 cup water, bring to a boil for 5 minutes.  Cool, add to strawberries, 1/4 cup corn syrup, and 1/4 cup lemon juice,  mixing well.  Let sit in the fridge for a few hours to chill, then use in your ice cream maker as you would ice cream.
 In about 25 minutes you'll have yummy sorbet, but I put it in the freezer for a few hours to firm up.

Sunday, June 26, 2011

Milk: Making butter

With the increasing price of food more people are choosing to buy locally or grow their own.  I didn't realize how expensive butter had gotten until the cows dried up and I had to start buying it again.  YIKES!!!  I miss the days when I was forced to make it every week with all my extra cream.  In a normal week, I had enough cream to make 9 cups of butter.  Since I make almost everything from scratch, I plow through butter like crazy.  Luckily I still have some homemade in the freezer, but there was a time I couldn't give it away fast enough....silly me.  Here is how I make it.


 First get yourself one of these:

  Or these:
 Or worst case scenario, one of these:

After milking, let the milk rest in the refrigerator for at least 12 hours to naturally separate.  Skim the cream off the milk. With jerseys, you get a LOT of cream, it's easy to see the line separating the milk and cream.  Goat and sheep milk are naturally homogenized, but I have Nigerian Dwarfs and their milk is high in butterfat and separates somewhat.  Cow's cream normally yields yellow butter, and in the spring on fresh grass, it's so bright that it almost looks fake.  Goats convert yellow beta-carotene into a colorless form of Vitamin A, so you'll get white butter from them unless you add coloring to it (kind of defeats the purpose of 'natural' though, don't you think??)
At this point, you can pasteurize it if you want, bringing it to180 degrees F, then cooling it back down in an ice bath to about 60 degrees. Otherwise, set it on your counter for a few hours to get to room temperature, hopefully your room isn't too hot or too cold, 65 is as high as I would let it get.
I get all my equipment out before I start, you really don't want to have to rummage around in drawers looking for something with butter-covered hands.  I use a food processor, a sieve, a colander with a bowl underneath, nitrile gloves, butter knife, empty container, and large measuring bowl filled with ice water.

Pour cream into the food processor, taking care not to fill it past the liquid line.  Turn on the processor and let it go.  The cream will go from liquid to whipped cream to butter.  The pitch in the noise of my processor changes when butter forms and the liquid starts sloshing around differently than with whipped cream.  Some days it only takes a few minutes for butter to form, others longer.

Usually the temp of the cream is the deciding factor, but if you making many batches of butter, the processor may get hotter changing the time it takes to make it butter.  Around 60-65 degrees is ideal.  Once I made it when it was too warm, it didn't get to butter, more of a melted whipped cream bunch of yuck. 

Turn off the processor, and pour the contents through a sieve, capturing the buttermilk in another container for other uses.  Put the butter back into the processor and add ice water (filter through the strainer to capture any ice) and proceed to wash the butter in ice water.  I usually only turn on the processor for a 30 seconds to a minute at a time to clean out all the buttermilk. Rinse and repeat about 4 or 5 times. If you do not clean all the buttermilk out of the butter, it will start to smell and go rancid....no one wants butter that smells like feet!!

Once it's done rinsing, I wear gloves (to make cleanup easier) and squeeze all the water out of the butter. What a workout for your hands!!  I then either put it in a container to use daily on toast or put it in one of the nifty adjustable measuring cups that you can push the contents out, nicely forming a full cup of butter (or whatever measurement you choose!)  I wrap them in waxed paper and then into a freezer ziploc bag and freeze them for up to a year.   You can find some nice butter molds online if you want to give your butter away.
When I'm finished, I usually give the buttermilk to the chickens.  You can cook many things with buttermilk (just bear in mind that it's not 'cultured' which has different qualities).

It's a nice treat for the hens. Since they gift me with so many eggs and keep the bug population down, I like doing something special for them.
 Once again participating in the Homestead Barn Hop, click to find some more interesting blogs!

Sunday, June 19, 2011

Chickens: The gateway animal

It all started with the chickens.  
 We were so nervous bringing those first chicks home and full of questions, after all what did we know about livestock?  I had bunnies and an ornery billy goat growing up, but birds were a whole new world to us.  We'd have to build a coop and pen to protect them from hawks and coyotes.  We had read a statistic to expect 10% mortality in chicks, so we bought 8 to start with.  Luckily only one turned into a rooster, Henry, and we didn't lose any of them.  The other 7 were wonderful, happy to see us (usually because we were bearing gifts of food) and produced a ton of eggs for us.  Henry became very protective of his girls to the point where he became our first butchering project after several attacks on my hubby and I.

Only now looking back at all our additions can I truly say that chickens got us hooked, and hooked good with their promise of daily fresh eggs and yummy meat. 

Not only that, but they brood their own babies to make MORE egg-layers and MORE meat!  

Once they got us hooked, the turkeys, cows and goats weren't too far off.

 Once again, I'm participating in the Homestead Barn Hop, click to find other interesting blogs!

Friday, June 17, 2011

A walk in the woods

My hubby and I promised ourselves and the munchkins that we'd do more than work on the ranch this summer.  Although we can't take any big trips because of our commitment to the animals (and an incredibly hard time finding a substitute teat squeezer) we can still get out and do day trips.  Today we went for a hike to see some waterfalls.

In our area, there is no lack of falling water and this hike was short and relatively easy.  It was a good one to break us in after a period of inactivity. 

Baby was a teeny tiny upset that she wasn't going to hike along, but once she understood that she was still going, all was right with the world again. 


Once we made it to the waterfall, we let the kids play on the rocks and in the water.  Since this is snow melt, it was really chilly.  There was another family relaxing in the sun and the girls made fast friends with them.  Soon they were all chucking rocks into the river, examining the bugs and eating honeysuckle nectar.

Despite our warnings, the 4yo still fell in up to her chin.  It was a long soggy hike back to the car, but she's trooper and never complained.
She also insisted taking a family pic.  You can see how well that turned out.


After our hike, we treated ourselves to pizza and ice cream....now we need another hike to work those off now!

Monday, June 13, 2011

Greenhouse, how I love thee


Before planting


Six weeks later.


I use the Square Foot Gardening method.  You use 4 4'x6" boards, to make a 16 square foot box, then attach some lathing strips over the top to make 16 sections within each box.  Mel, the creator of SFG, came up with a mix of peat moss, vermiculite, and a variety of compost.  It works great and each spring I only have to add more compost, not hard to find on the ranch!  The theory is that you can plant something different inside each section without disturbing other sections.  I do this, but sometimes finding myself questioning what I planted when I find my labels have been washed off....darn fake sharpie!  I have a drip system and also some sprinklers. 


I didn't pick all my carrots last year and now they are getting ready to produce seeds, so I will be saving them to replant next year. 


I start my seeds in the house, these seeds will eventually go into the garden when it warms up enough.  I try to buy only heritage seeds so I can harvest and save the seeds for next year.  Hybrid seeds usually won't grow after you harvest them. 


 Onions, year 2.  They were pretty tiny last fall, so I let them go.


 Potatoes


Spinach


I started growing one box full of everbearing strawberries.  This is an experiment for me, as I have about 300 plants growing in the garden, too.  I want to see how long I can harvest berries.  In the garden last year, I was picking berries into November!


Green beans


Peas climbing the cattle panel.


I love my Greenhouse.  I've had it for a few years now, but still haven't taken full advantage of it's usefulness.  This winter I waded through the snow to see what was going on in there.  Turns out the feral barn cats figured out how nice and warm it was and made it home.  (Which led to finding some 'surprises' when I was getting ready to plant this spring.....ewwwww!!)   I was even more surprised to find out that my cilantro had re-seeded and was growing great.  My peas also somehow spread out and seeded themselves, so I have peas in random sections.  I started pulling weeds only to find my thyme finally grew, luckily I was able to replant them after pulling them out!


 I'm participating in the Homestead Barn Hop.  If you like my posts, then you're sure to find others that are similar!

Sunday, June 12, 2011

Growing new stuff from old stuff!


I started growing celery from the bottom of a store-bought bunch.  I never knew you could do this, but it's doing great.  I transplanted it in one of the boxes after letting it sit in a bowl of water for a few days.

I also am planting a pineapple from the top of a store-bought pineapple.  


I pulled the leaves off the bottom, let it air dry for a few days then placed it in a mason jar filled with water.  It took about 3 weeks until new roots started growing.

In about 14 months, I should have a new pineapple ready to harvest!